
Sometimes I work remotely. Other times I mess things up. When I work remotely and I mess something up on my server, say, the VPN connection, because I cannot leave well enough along when travelling, I have to wait until I am back.
At the same time, ever since I got a Dell R740xd and put all eggs in one basket, if I ever need to reboot the server or it goes down, I am left with no Internet and no remote access, not to mention any other services. While that’s not as painful as it can be, since I can always hot-spot my phone, I wanted a solution that allows me to deal with some of the downtime.
How to HA? I want the best!
So what does the best scenario look like? At least double redundancy on everything. Double fibre, double switches, double routers, double servers, redundant electricity etc.
Of course, this is not realistic, especially for a home setup, for obvious reasons. Most homes would not be equipped to support dual fibre, and redundant switches can be very expensive. So, what alternatives do we have?
How about something more reasonable then? Enter keepalived
Keepalived is a Linux daemon which implements the VRR Protocol (Virtual Router Redundancy Protocol). Keepalived can support many scenarios (such as load balancing through the IPVS module), but for my use case I only needed one of its capabilities.
The way it works, is that we have a number of servers, one of which is defined as the MASTER and the others as BACKUP. Keepalived runs on all servers, but only the MASTER has a VIP (or Virtual IP) assigned to it, alongside its main IP.
The servers speak to each other and determine if the MASTER is still up. If it is, nothing changes, all requests to the VIP will go to the MASTER. If it isn’t responding or if there are (configurable) checks that are failing, the remaining (BACKUP) servers will perform an election and one of them will assign the VIP to itself, thus becoming the MASTER. As soon as the MASTER comes back up (or if you have a different configuration the decision logic can differ), the VIP is assigned back to it and the temporary MASTER becomes a BACKUP again.
It is so brilliantly simple, because it removes the need for a centralised authority or even a quorum for my use case. So how can we put it to use?
My desired setup
I have the following components:
- An OpenWRT VM which acts as my main router. This has a Mellanox fibre card directly passed through to it.
- A PiHole LXC container that acts as my ad-blocking DNS.
- A Domain Controller VM.
- A TP-Link router running OpenWRT which has a 4G modem on it.
- A Raspberry PI that runs PiHole.
When everything is working as it should, the following should happen when doing DNS look-ups:
- A DNS request, should first go through the router, because that is where I have DHCP & host names configured.
- While ideally these should belong in the DC, remember that the DC is a VM and if it goes down, I’m toast. Hosting multiple DCs at home isn’t that useful to me yet, though I have a backup server I could use if I desire.
- The router should forward my internal domain’s requests to the DC, but every other request should go to the PiHole.
- If a request goes to the DC, it should be then forwarded to the PiHole.
- The PiHole should use the router for contacting external DNS servers for resolution.
For gateway requests, the setup should be as follows:
- A request arrives at the router.
- The router sends it out through its gateway.
HOWEVER, there is an additional twist on the above. I do not want to tie the device types (virtual & physical) together. Sure, the LXC PiHole might be down, but the VM Router might still be up and vice verse. I want to use whatever is available, giving priority to the virtual ones of course.
Flow
The following diagram should explain what I am trying to achieve:
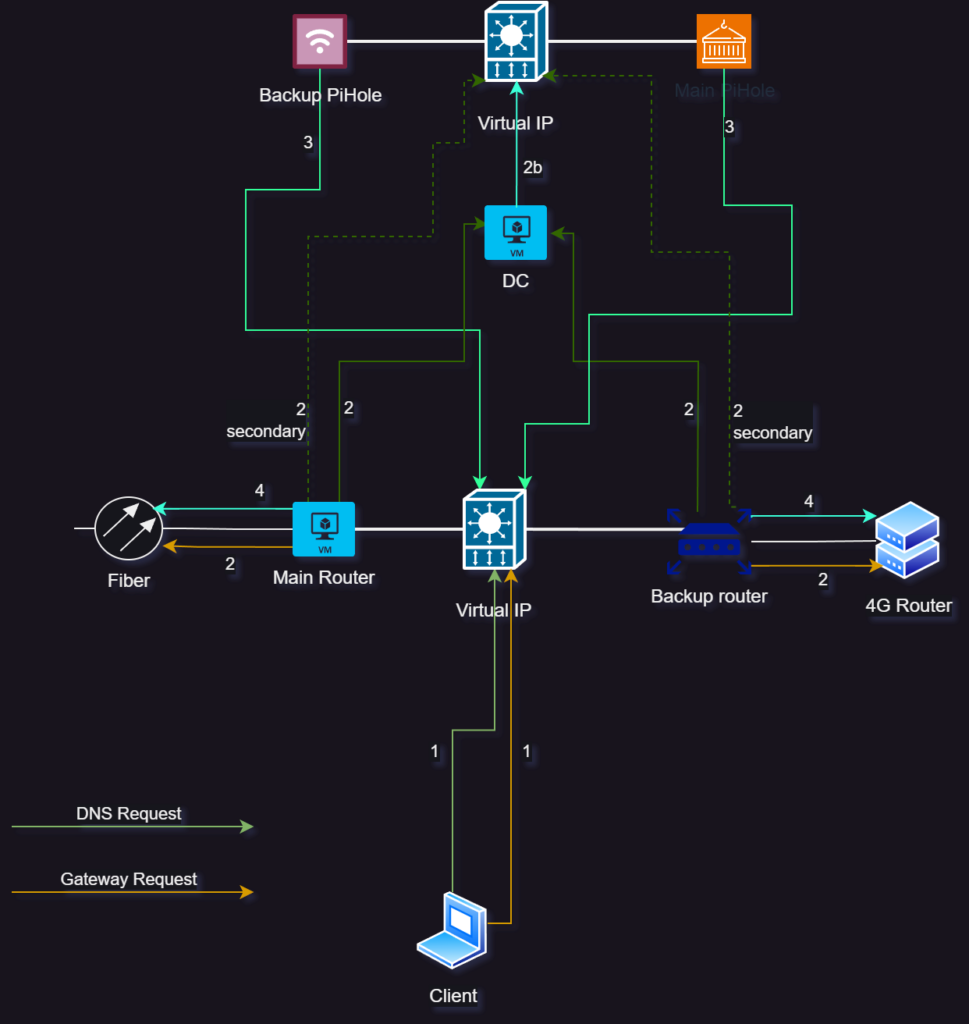
It is not as complicated as it looks. The main idea behind this, is that I am using two VIPs, one for the routers and one for the PiHoles. Priority will be given always to the Main devices, which happen to be the virtual ones.
So, assume that we need to resolve the host name of a website from a device. Here is how it goes:
- The DNS server passed through via DHCP options is the VIP of the router, so the device will contact whichever router is available, giving priority to the Main one.
- The router will determine that it doesn’t need to forward the request to the DC, and its forwarding rules will dictate to forward the request to the VIP of the PiHoles.
- Depending on which PiHole is available (again, giving priority to the main one), it will take the request and resolve it.
- However, if it needs to do an external look-up, it will forward the request to the external DNS using as a gateway the VIP of the router, so as to not be tied to a specific one.
Implementation
OpenWRT configuration
Let’s configure OpenWRT first. To do that, we need to install the keepalived package. After this is done, we can either configure it using the UI (by also installing the related LUCI package) or going through the CLI.
In /etc/config there is a keepalived file. Alter the file so that it shows:
 config globals 'globals'
        option alt_config_file '/etc/keepalived/keepalived.conf'
This will allow you to use the keepalived configuration file instead. Create a file named keepalived.conf under /etc/keepalived/ and put the following contents in it:
global_defs {
   router_id MainRouter
}

vrrp_instance V1_Lan {
        state MASTER
        interface br-lan
        virtual_router_id 10
        priority 100
        advert_int 1
        unicast_src_ip MainRouterIP
        unicast_peer {
                BackupRouterIP
        }

        authentication {
                auth_type PASS
                auth_pass PASSWORD
        }

        virtual_ipaddress {
                VIPWITHCIDR
        }
}
On the secondary Router, install the package and modify the same keepalived configuration and also create a keepalived.conf file as shown above. The contents should be as follows:
global_defs {
   router_id BackupRouter
}

vrrp_instance V1_Lan {
        state BACKUP
        interface br-lan
        virtual_router_id 10
        priority 90
        advert_int 1
        unicast_src_ip BackupRouterIP
        unicast_peer {
                MainRouterIP
        }

        authentication {
                auth_type PASS
                auth_pass PASSWORD
        }

        virtual_ipaddress {
                VIPWITHCIDR
        }
}
Let’s have a look at what each line does.
- Lines 1-3: We give a name for each router that keepalived uses. This can be your hostname or whatever you want. You can have other options here as well (such as e-mail notifications).
- Line 5 until the end: This is where we define a virtual router instance. You can have more than one if you so desire.
- Line 6: On the Main router we define the default state as MASTER, on the backup(s) as BACKUP. In our scenario, this is the desired status.
- Line 7: The interface that this virtual router will run on.
- Line 8: If you have multiple virtual routers, you need to use different IDs on each. However, these IDs obviously need to match between servers within the same HA domain.
- Line 9: In order to signify the desired configuration, the devices participating need to have different IDs, with the MASTER one higher than the BACKUPs.
- Line 10: The interval of checks, in seconds
- Line 11: This should be the already existing IP of the device.
- Lines 12-14: Here you configure the IPs of the other devices participating.
- Lines 16-19: You can configure authentication via either a plaintext password or auth headers (which should be more secure but less compatible). Make sure that the pass you use is up to 8 characters long!
- Lines 20-23: This is where you define the Virtual IP along with the subnet (using the CIDR notation). This should be the same between the two configuration files.
The first step is done. If you replace the gateway on your devices with the VIP and then shutdown the main router, you should be able to see an almost immediate fail-over to the backup router.
You can check the logs or the UI (if you’ve installed the LUCI package) and see the status of the service. This is my main router:

And this is my backup:

PiHole configuration
This is simple and I am not going to cover it in any detail, because it is using the exact same keepalived.conf files. Obviously, there is no configuration file under /etc/config, since this should be a regular Linux installation. Make sure that you use a different VIP and virtual router ID for the PiHoles!
You need to configure the PiHole’s networking to use the routers’ VIP as its gateway, but you are essentially done here. This will ensure that external DNS requests will go to any available router.
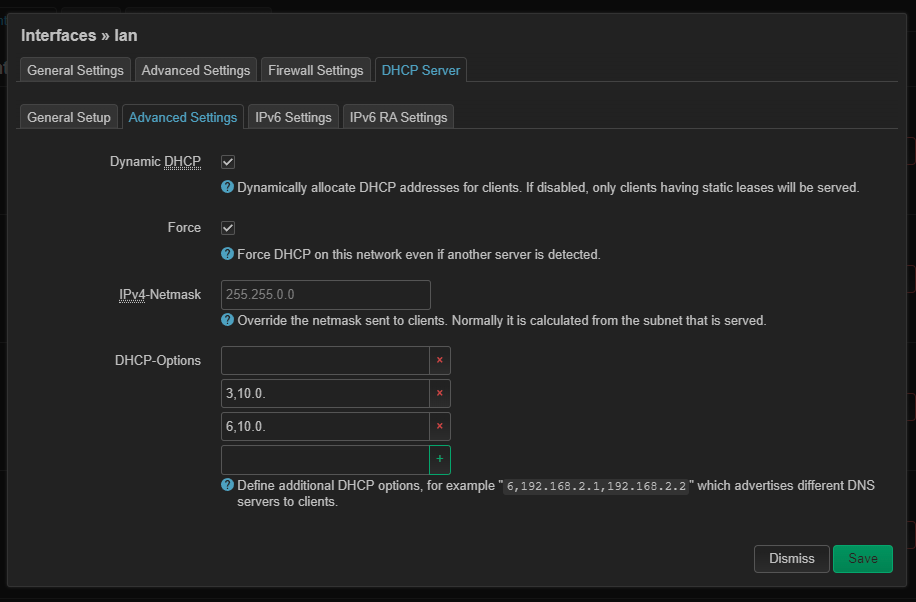
DHCP configuration
Back to OpenWRT, go to the DHCP section and under Forwards add the VIP of the PiHoles. This will ensure that all DNS requests coming to the router will be forwarded to any available PiHole. The numbers shown here are incomplete. I know, they are internal IPs, but I am paranoid anyway 🙂

Then, go to the interface you want to change (e.g. lan) and open the Advanced Settings under DHCP. You need to define two DHCP Options here, 3 and 6. Option 3 defines the gateway and Option 6 defines the DNS. These options are passed along to devices getting an IP from DHCP and the format is: OPTIONNUMBER,IPADDRESS – the separator is a comma.
And that’s it!
Additional Options
This works great when the router VM goes down, but it does nothing if the connection simply drops, because the instance keeps running happily. I have used the following method to handle this:
Add the following section below global_defs in keepalived.conf:
vrrp_script ifcheck {
      script "/etc/keepalived/ci.sh"
      interval 1
      timeout 1
      rise 3
      fall 3
}
Create a file ci.sh as shown in the script with the following contents:
#!/bin/sh

RES=0


RES=$(ip -4 addr show br-wan | sed -Ene 's/^.*inet ([0-9.]+)\/.*$/\1/p')
echo $RES
echo ${#RES}

if [ ${#RES} = 0 ]; then
        exit 1
fi
The above file checks the wan connection (named br-wan in my case) and exits with an error if there is no IP assigned to it. Keepalived will catch the error and cause a failover.
A few more things
There is an additional step you can take, in order to successfully fail over NATed connections, using conntrackd. However, I haven’t implemented this yet, since the backup router’s 4G connection runs behind a CGNAT and most applications have internal retries, so you will most probably not even notice it.
A word about VPN: The main idea was to have a way to get back to my network, should my server disconnects or even shutdown, so I can reboot it via iDRAC. Since I am behind a CGNAT on my backup router, I cannot use OpenVPN. I’ve installed Tailscale on the PiHole, even though I get icky when third parties are involved, but it seems to work reasonably well with good enough performance. I have now a hybrid setup where OpenVPN is my main VPN connection and Tailscale is the secondary one, but I may end up ditching OpenVPN entirely and replace both VPNs with Tailscale. Headscale is an alternative, but since I’m now self-hosting everything, I wouldn’t have anywhere to put it.
Closing words
So, how well does this work? In my tests, I cold-booted the server and had a Youtube video playing while refreshing a web page at the same time. The video never stopped and the page refresh hesitated for a second, but loaded immediately after. Tracerouting a public website, shows that the backup router was the immediate next step. As soon as the server rebooted and the VM OpenWRT was up, traceroute reverted to using the main router as its next step.
For DNS, you could in theory use a secondary DNS instead of a VIP, simplifying things, but I found that it tends to be sticky and not as quick to respond, in other words, the built-in fail-over mechanism that DNS has would not react as fast failing over and back. Your mileage may vary!
Have fun, feel free to send me any questions at blog[at]vtable[dot]org. I had to disable comments here, since the amount of spam was unmanageable.