
Following is the network configuration I want to achieve. I have a home network, a standalone server somewhere on the internet and some devices that may not always be connected on the home network. I want everyone to be able to see everyone else and I want to do this through OpenVPN. Note that I am not going to cover the road warriors here, since it’s a bit more complicated than I expected. I’ll post a follow up soon with that information.

A few clarifications are in order though:
- The Server runs Windows Server.
- The Router runs OpenWRT 18.06 at the time of the writing.
- Since the Server is well… a Server, it has a static IP; all other IPs are assumed to be dynamic.
- Oh, and just to make it interesting, both the Server as well as one of the machines in the Home Network are configured as domain controllers on the same domain, which is not visible to the outside world.
- I need to decide who is going to be the OpenVPN server; that can be either the Server or the Router. In this example I’ve chosen Server.
- Server has its own Windows Firewall as well as the host company’s firewall. You can ignore the latter if you don’t have one, but make sure to open the same ports!
- Security tops performance. No concessions, which means we will use certificates for authentication and the connections must be encrypted.
- Finally; if you think I’ve messed up somewhere; feel free to contact me and let me know.
Looks rather simple and… it is. But the devil is in the details and configuring OpenVPN properly can be a pain. I am by no means an OpenVPN expert but this is the configuration I currently run on my networks and am happy with it, however getting there was a bit tricky due to certain aforementioned details that are easy to miss.
Let’s get started!
Configuring the Server
Initial OpenVPN configuration
Download OpenVPN and install it.
After the installation succeeds, OpenVPN will have created a virtual network adapter. Rename it to something that makes sense, in this example I’ll name it VPN. We will need this because in Windows, OpenVPN needs to know the name of the adapter it will use.
Open a command window and navigate to the C:\Program Files\OpenVPN\easy-rsa folder (or in the easy-rsa folder under where you have installed OpenVPN).
Type init-config.bat ⏎ (press Enter).
Type notepad vars.bat ⏎, or edit the vars.bat with another editor. You should edit the following fields:
set DH_KEY_SIZE – I would change it to at least 3072, since according to a EU report, a key size of 3072 should be sufficient for the next 10 years.
Fill the following fields as you please. By changing the vars.bat file this way you won’t have to do it every time you generate a certificate.
set KEY_COUNTRY
set KEY_PROVINCE
set KEY_CITY
set KEY_ORG
set KEY_EMAIL
type vars.bat ⏎ and then clean-all ⏎
Create a Certificate Authority
The server will also act as the certificate authority for issuing certificates for itself as well as the clients.
Type build-ca.bat ⏎ and fill in the fields it wants. Give a unique name to the Common Name parameter when asked, e.g. CA.
Build the Server Certificate
Let’s name the server… Server! Of course, you can use a different name in your case, just make sure that you use the same name in the following instructions.
Type build-key-server.bat Server ⏎ and fill in the fields as you please. Make sure that the Common Name parameter is Server.
If done correctly, you should be able to see 3 files under the keys folder, named Server.crt/.csr/.key
Build the Home Certificate
We will name the certificate for the home network as Home. You can choose anything you want obviously.
Similar to the previous section, type build-key.bat Home ⏎ and make sure that Common Name is set to Home.
Build the Diffie-Hellman parameters
Type build-dh.bat ⏎ and wait until it’s done.
Generate a TLS key for the encryption of all sessions
Type ..\bin\openvpn –genkey –secret ta.key ⏎
Create a configuration file for the Server
Now that you have created the necessary keys it’s time to create an OpenVPN configuration file for the server. Go one folder up (C:\Program Files\OpenVPN) and then into the config subfolder. Create a new file named Server.ovpn, or use the server name you used before in case it’s different.
OpenVPN configuration can be overly detailed, but for our case, you can add the following contents into the Server.ovpn file and it should work without a hitch (replace the IP with the public server IP in the local directive):
mode server
# The IP to bind to
local X.X.X.X
# Better use a non-standard port
port 12345
# Enable TLS
tls-server
# Limit the available TLS ciphers
tls-cipher TLS-ECDHE-RSA-WITH-AES-256-GCM-SHA384:TLS-DHE-RSA-WITH-AES-256-GCM-SHA384
# Enable HMAC packet authentication
auth SHA512
# Limit the allowed TLS protocol
tls-version-min 1.2
# Allow mobile clients to have some leniency in their connection (replay protection)
replay-window 256 60
# Use UDP
proto udp
# Use tunneling rather than bridging.
dev tun
# The name of the network adapter that will be used.
dev-node VPN# Keys locations
ca “C:\\Program Files\\OpenVPN\\easy-rsa\\keys\\ca.crt”
cert “C:\\Program Files\\OpenVPN\\easy-rsa\\keys\\Server.crt”
key “C:\\Program Files\\OpenVPN\\easy-rsa\\keys\\Server.key”
dh “C:\\Program Files\\OpenVPN\\easy-rsa\\keys\\dh3072.pem”
tls-auth “C:\\Program Files\\OpenVPN\\easy-rsa\\keys\\ta.key” 0
# Don’t use a topology compatible with older versions (net30)
topology subnet
# The OpenVPN IP of the server
server 192.168.201.0 255.255.255.0
# Routings that need to be configured for inter-subnet communication
route 192.168.200.0 255.255.255.0
route 192.168.202.0 255.255.255.0
push “route 192.168.200.0 255.255.255.0”
push “route 192.168.202.0 255.255.255.0”
# Client-specific configuration (will be used for iroutes)
client-config-dir ccd
# Allow client-to-client communication
client-to-client
cipher AES-256-GCM
# Configure compression on all ends
compress lz4-v2
push “compress lz4-v2”
# Limit the amount of connected clients to what we would expect
max-clients 10
# Configure logging
status “C:\\Program Files\\OpenVPN\\log\\openvpn-status.log”
log “C:\\Program Files\\OpenVPN\\log\\openvpn.log”
log-append “C:\\Program Files\\OpenVPN\\log\\openvpn.log”
# Remember the IPs of connected devices
ifconfig-pool-persist ipp.txt
# Some times the OS won’t assign a proper IP address and we need to foce it
dhcp-renew
# Miscellaneous
keepalive 10 120
persist-key
persist-tun
verb 3
mute 20
explicit-exit-notify 1
Add client specific configuration to the Server
Inside the C:\Program Files\OpenVPN\config folder create a subfolder named ccd. Navigate to it and in there create a file named Home. No extension, just Home and in it add the following line:
iroute 192.168.200.0 255.255.255.0
The short explanation about why we need to do this, is that iroute handles the internal routing table of OpenVPN. It tells OpenVPN which client owns which subnet. Whilst you still need the route directives in the server configuration, this will only set it up for the operating system. That means that now Windows knows how to route your packages, but OpenVPN doesn’t! By adding the above parameter we are instructing OpenVPN to route packages directed for the Home network to that subnet.
Finalising the configuration of Server
First, make sure that the OpenVPN Interactive Service is disabled and stopped. Then, ensure that the OpenVPNService is enabled and set to Auto-start. Start the service and look into the logs folder for any issues during initialisation.
Configuring the Router
Install OpenVPN on the router
It is actually simpler to use SSH to configure OpenWRT. You can use Luci (the OpenWRT UI) to achieve similar results, but I will cover installation using SSH here.
After you sSH to the router, run an opkg update ⏎ then run opkg install nano openvpn-openssl openvpn-easy-rsa luci-app-openvpn ⏎.
You don’t need to install nano, but if you don’t have another file editor it is recommended. In this guide I’ll use nano. You don’t need to install the Luci module for OpenVPN (luci-app-openvpn) if you don’t want to, but I use it as an alternative option or if you hate scp for copying files (which you will need to do later).
Create a configuration file for the Home Network
Type cd /etc/config ⏎ and then nano network ⏎. In the beginning or the end of the file add the following:
config interface 'vpn0'
	option proto 'none'
	option auto '1'
	option ifname 'tun0'
Then press Ctrl-X to save and exit. You have created a new interface named vpn0 which will connect to OpenVPN’s tun0 “physical” interface.
Type nano firewall ⏎ and add the following:
config zone
        option name 'vpn'
        option input 'ACCEPT'
        option output 'ACCEPT'
        option network 'vpn0'
        option masq '0'
        option forward 'REJECT'

config forwarding
        option dest 'vpn'
        option src 'lan'

config forwarding
        option src 'vpn'
        option dest 'lan'
This will configure the necessary firewall and forwarding rules.
You will need to upload some of the files you created during the server configuration. You will need to upload ta.key, Home.crt, Home.key and ca.crt to OpenWRT. You can also upload through the Luci OpenVPN panel after you edit the openvpn file (shown right after this paragraph) or by using the scp command in a Windows command prompt, as such: scp filename [email protected]:/etc/openvpn/keys . In this example I’ve used the /etc/openvpn/keys folder to upload the files; upload all four files using either approach.
Finally type nano openvpn ⏎ and add the following
config openvpn 'VPN'
        option client '1'
        option port '12345'
        option proto 'udp'
        option dev 'tun'
        option ca '/etc/openvpn/keys/ca.crt'
        option cert '/etc/openvpn/keys/Home.crt'
        option key '/etc/openvpn/keys/Home.key'
        option tls_auth '/etc/openvpn/keys/ta.key 1'
        option status '/tmp/openvpn.status'
        option keepalive '10 120'
        option auth 'SHA512'
        option persist_tun '1'
        option persist_key '1'
        option verb '3'
        option mute '20'
        option cipher 'AES-256-GCM'
        option nobind '1'
        option enabled '1'
        option remote 'YOURSERVERIP'
        option compress 'lz4-v2'
        option remote_cert_tls 'server'
Apply Changes
Type /etc/init.d/network reload ⏎ and then /etc/init.d/firewall reload ⏎ and finally /etc/init.d/openvpn enable ⏎
That’s it! If everything was done correctly, you should be able to ping 192.168.201.1 from any PC in the Home network and ping 192.168.200.1 (or whatever your address and subnet for your router is) from the Server.
Bonus! Making the Domain Controllers play nice with each other
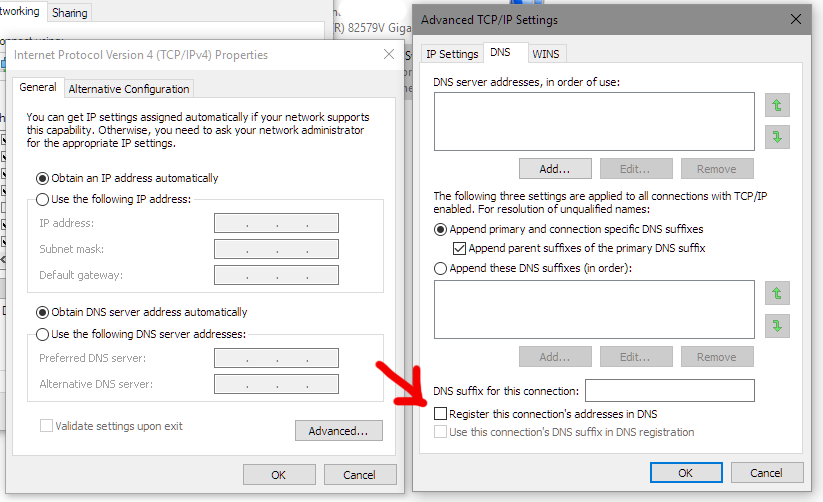
You may have noticed that we are not routing the Internet through OpenVPN. You can definitely do that, but it’s not needed for this purpose. So one of the problems I had was that the Server DNS Server would automatically assign itself both the OpenVPN and the physical IP to itself. I didn’t want that because that DNS Server was to be used only within the internal domain.
In order to fix it you need to do the following three things:
- Go to your network adapters, click on IPv4, click Advanced and go to the DNS tab. Uncheck the checkbox shown below.
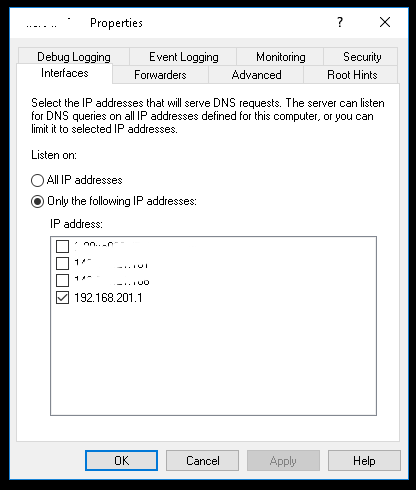
- Go to your DNS, right click on the server name and click on Properties. Then deselect all public interfaces and only select the OpenVPN one.
- Now go to Services and make sure that you change the DNS Server service to start as Automatic (Delayed Start). You must do that to ensure that the DNS Service will only run after OpenVPN has started and the virtual network adapter has been assigned an IP, otherwise the DNS Server will reset the IP bindings to all available IPs since the one selected originally does not exist (yet)!
Stay tuned for the next step where I’ll cover adding road warriors to the mix.